 Go back
Walkthrough for Royal Trouble: Honeymoon Havoc
General Tips
- This is the official guide for Royal Trouble: Honeymoon Havoc.
- It doesn't include solutions for mini games or lion head placements.
- If you notice any errors - please let us know.
Chapter shortcuts
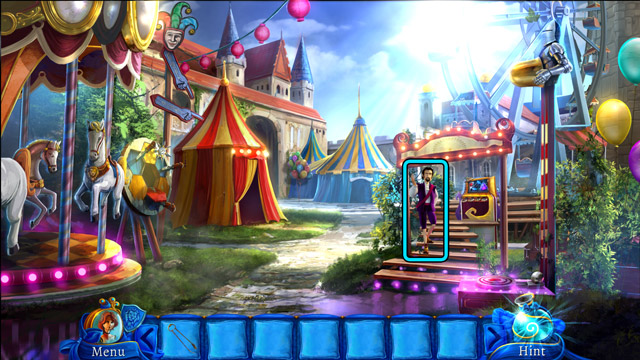
Chapter 1: Imprisoned again
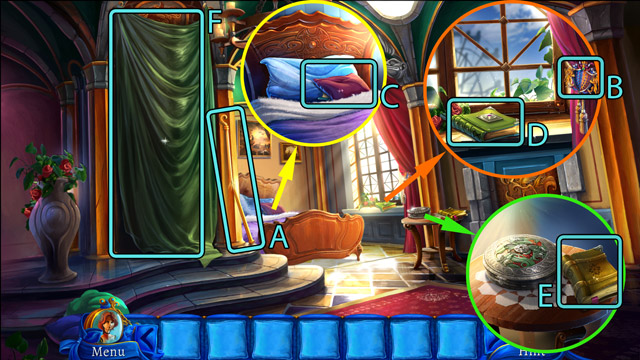
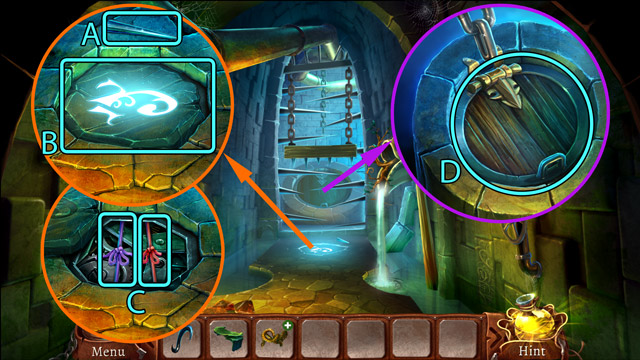
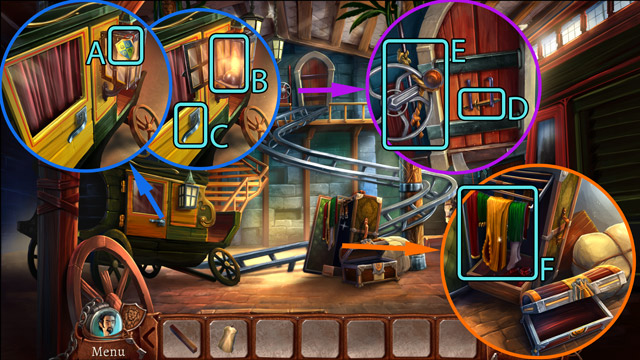
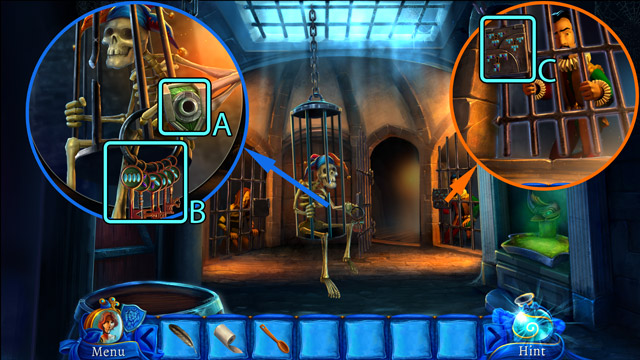
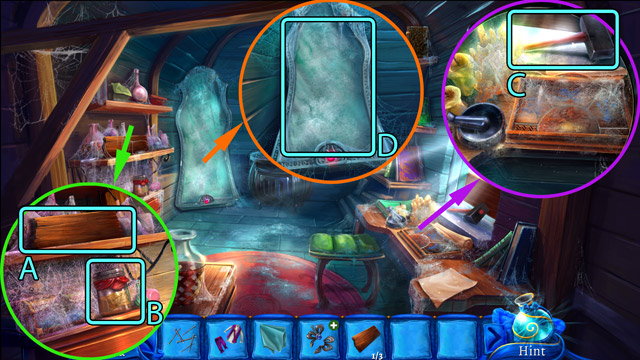
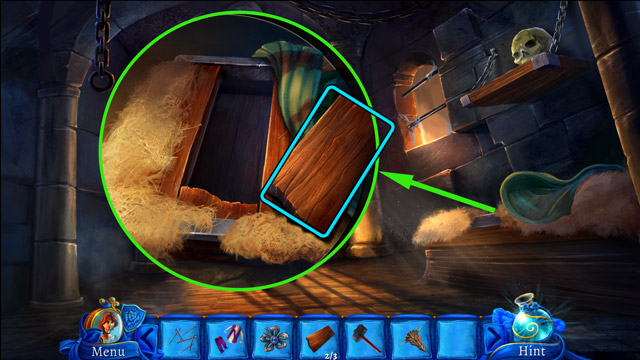
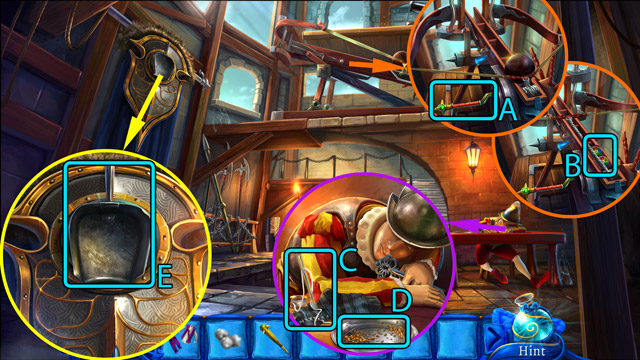
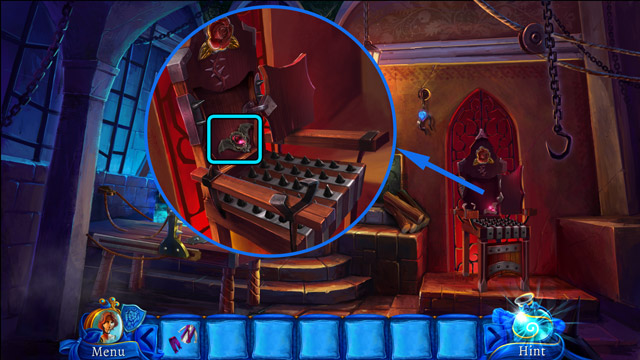
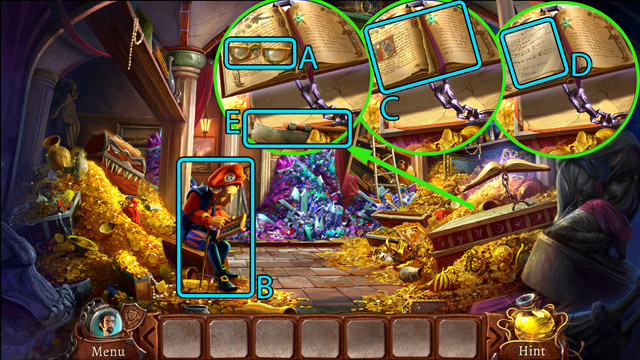
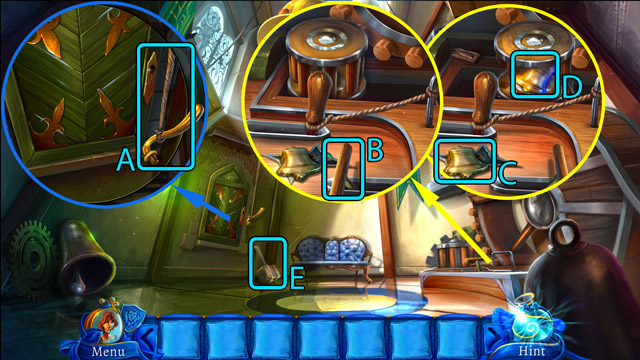
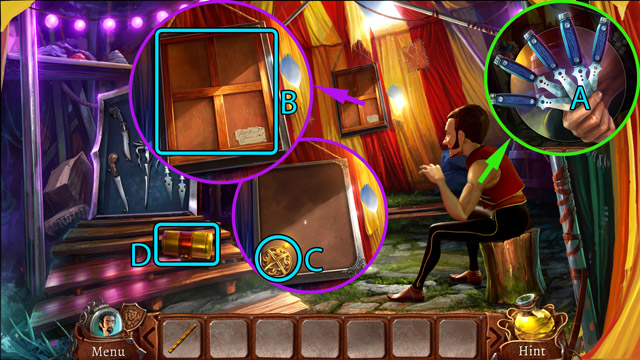
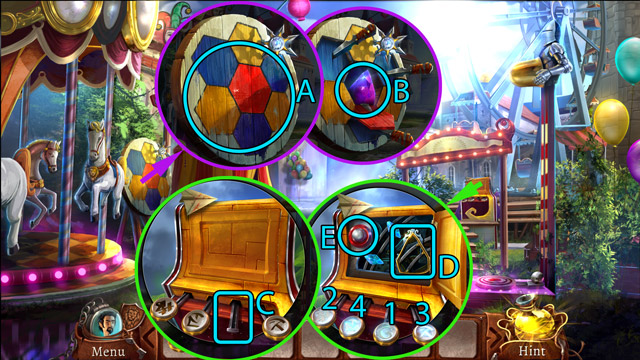
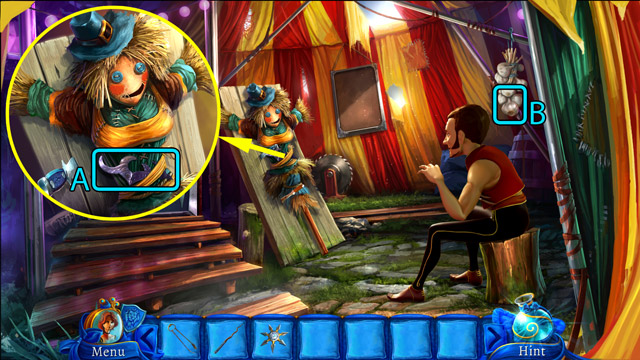
- Pick up the Broken rod (A).
- Take the crest which starts the collectible items quest (B), then pick up the Curtain rope behind it.
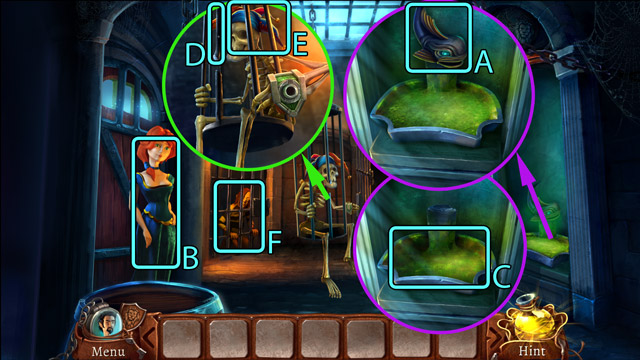
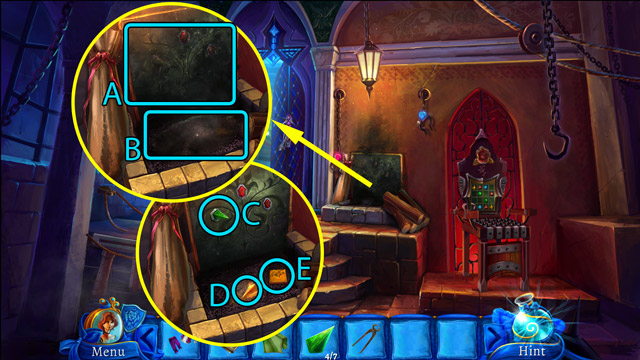
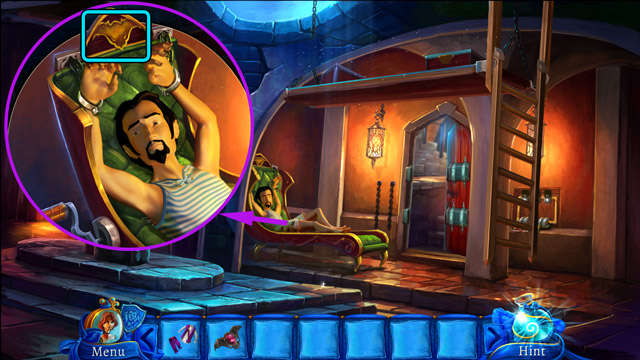
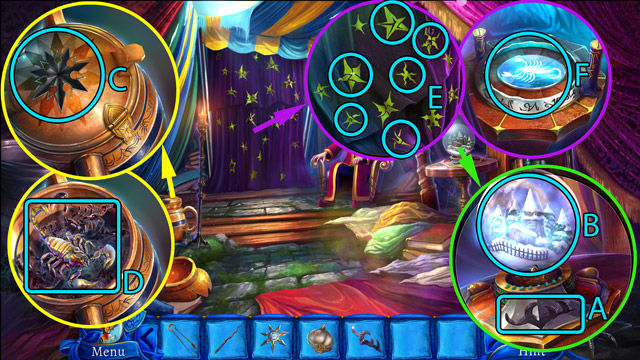
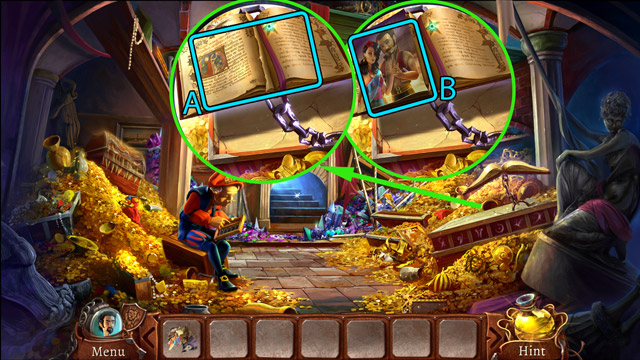
- Pick up the Green book (D).
- Move the pillow (C) and then pick up the Blue book under it.
- Pick up the Yellow book (E).
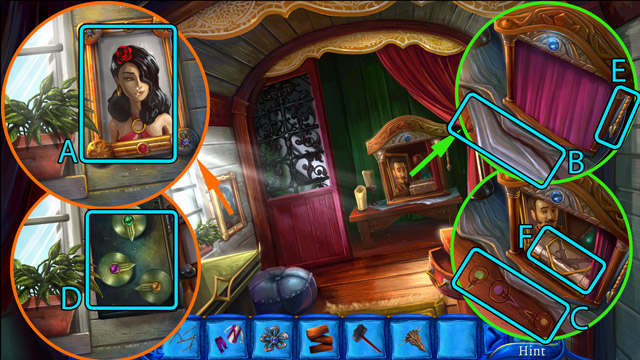
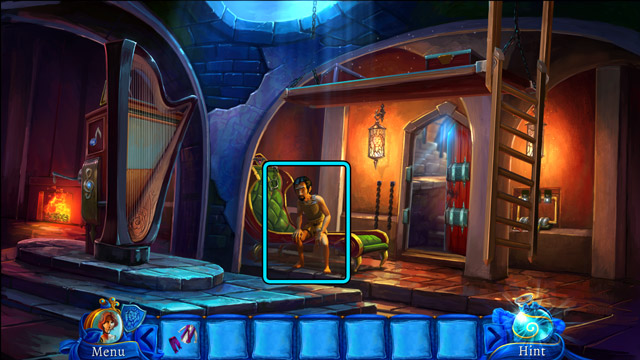
- Combine the Broken rod with the Curtain rope to get the Curtain rod.
- Remove the green curtain (F) using the Curtain rod.
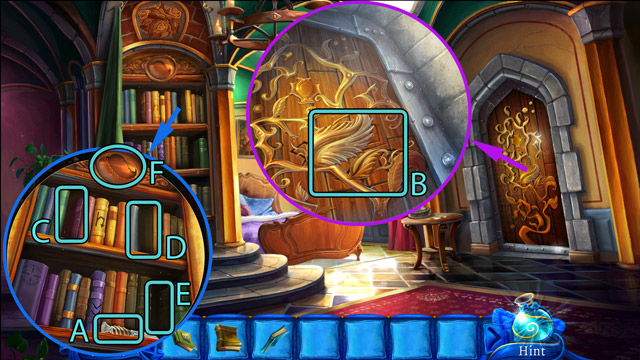
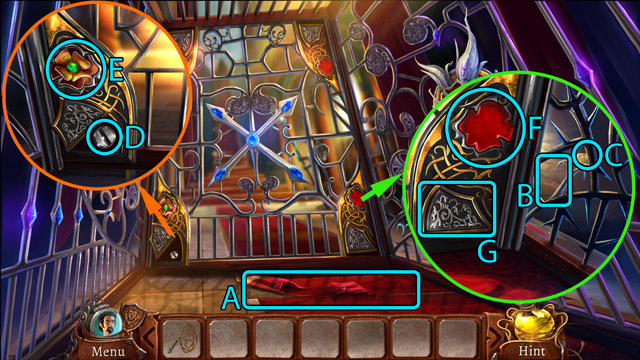
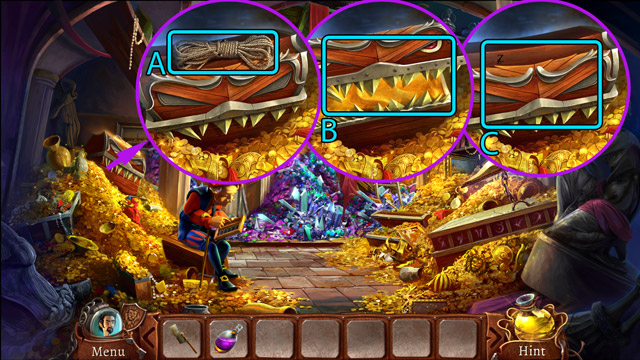
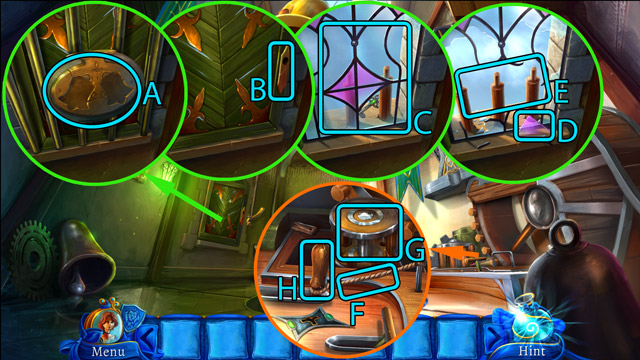
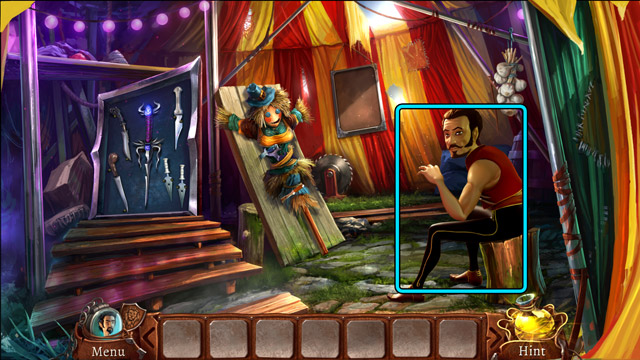
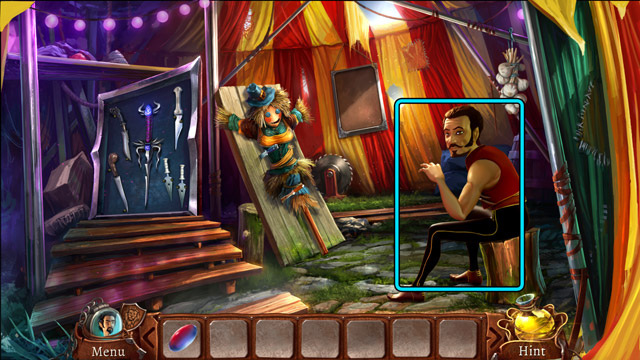
- Pick up the Paper knife (A).
- Using the Paper knife break off the decorations on the door (B). You will get the Ornamental leaf. Also, note the signs engraved in the wood. It hints the proper order of the books on the shelves.
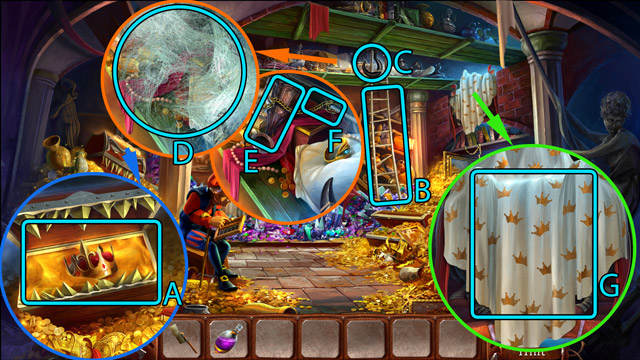
- Put the Green book in the (C) place.
- Put the Blue book in the (D) place.
- Put the Yellow book in the (E) place.
- Put the Ornamental leaf in the leaf-shaped space on the top of the shelf (F).
- Go through the hidden entrance.
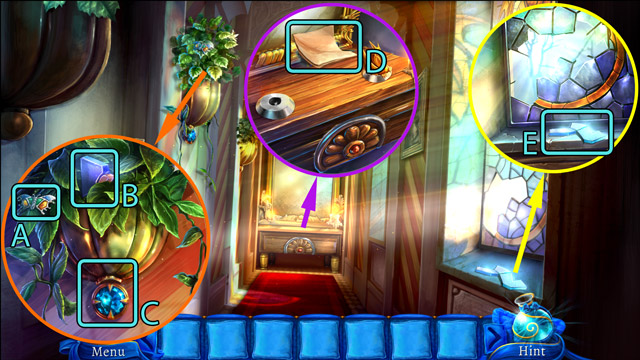
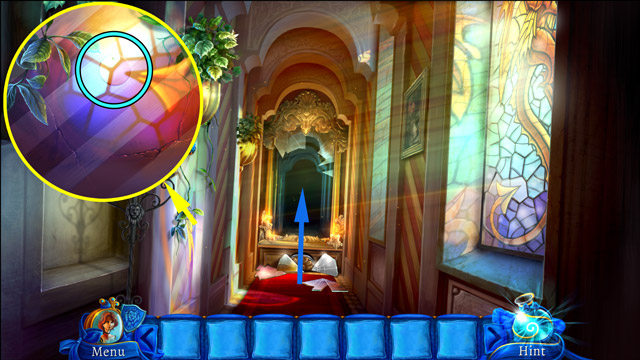
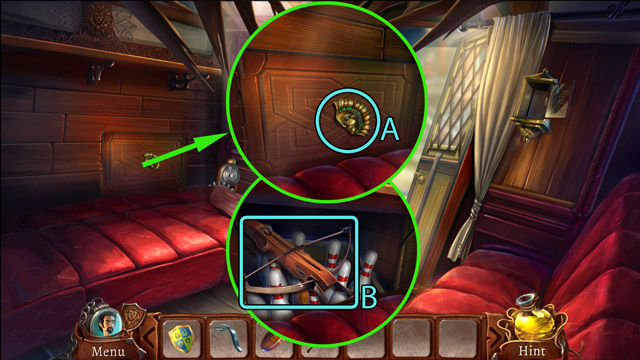
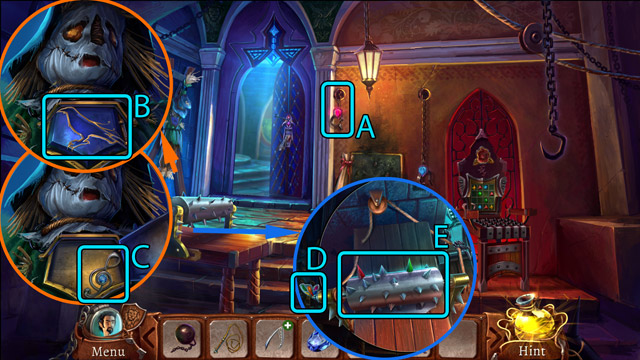
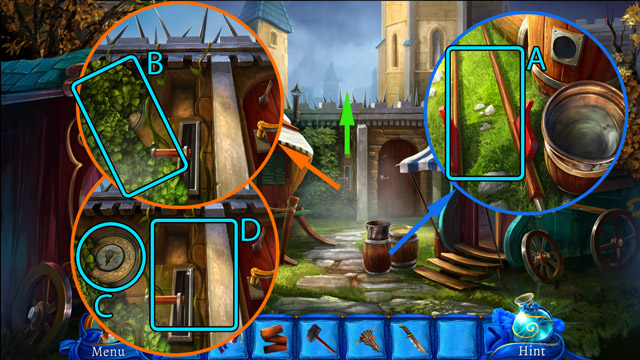
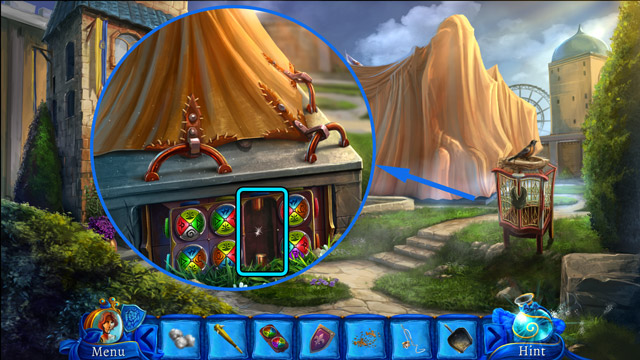
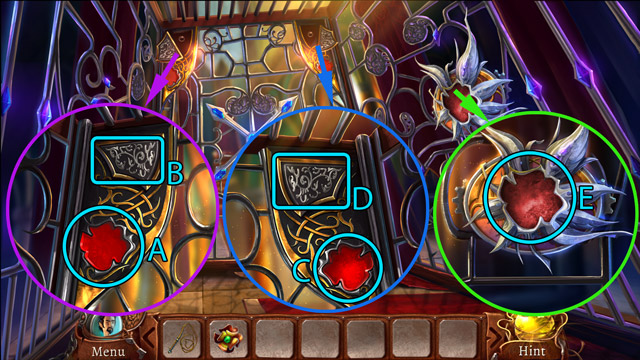
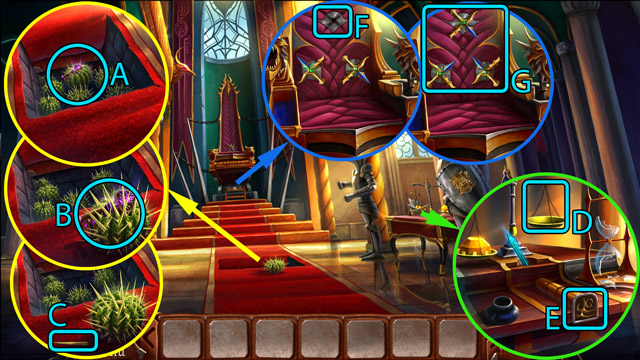
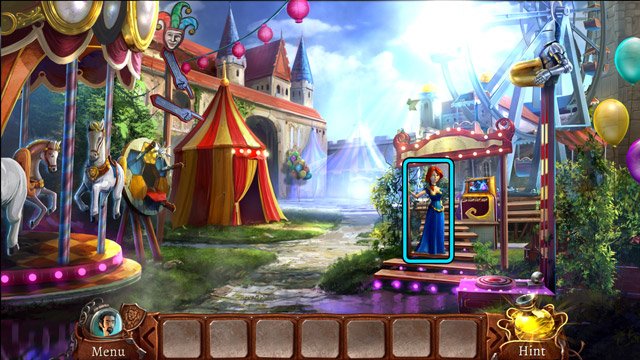
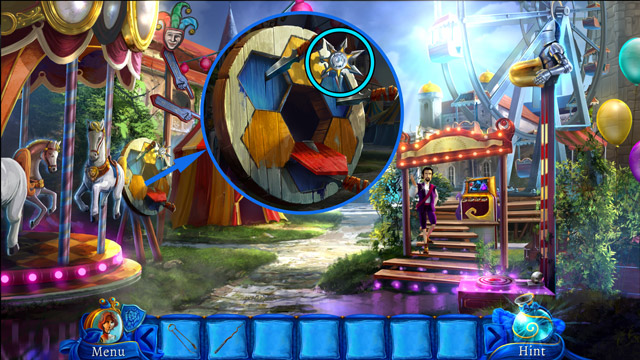
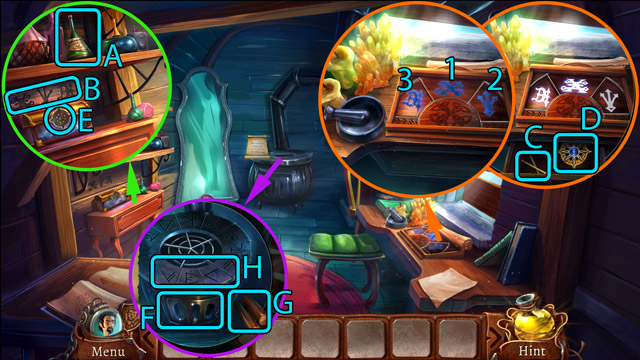
- Pick up the Butterfly (A) and the first Piece of stained glass (B).
- Pull the knob (C) under the flowerpot.
- Read the piece of paper (D) and then pick up the second Piece of stained glass under it.
- Pick up the third Piece of stained glass (E).
- Go back to the room.
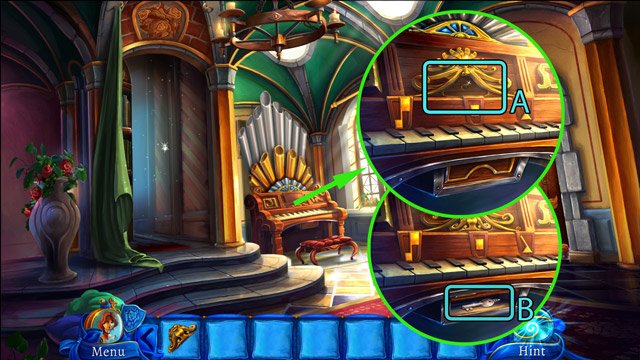
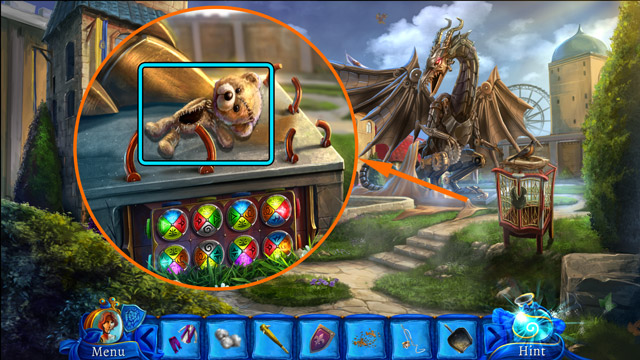
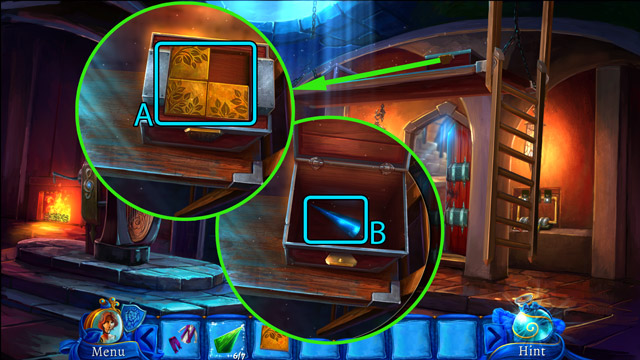
- Open the case (A) using the Butterfly.
- Pick up the Knight figurine (B) and the fourth Piece of stained glass (C).
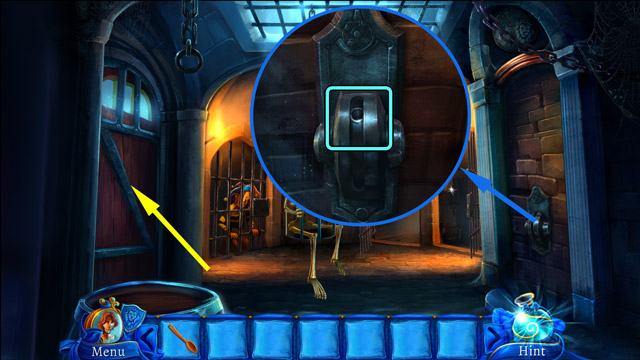
- Pull the rope that fell out of the mouth of the strange sculpture.
- Pick up the fifth Piece of stained glass and go back to the corridor.
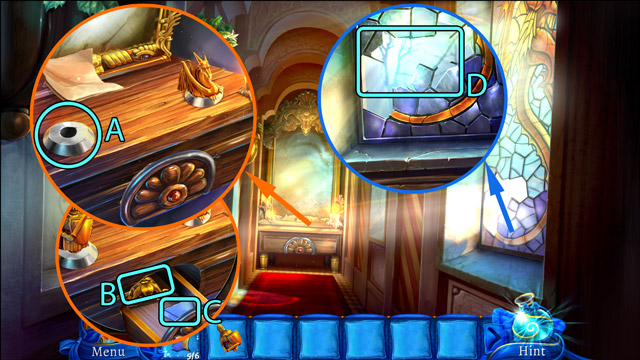
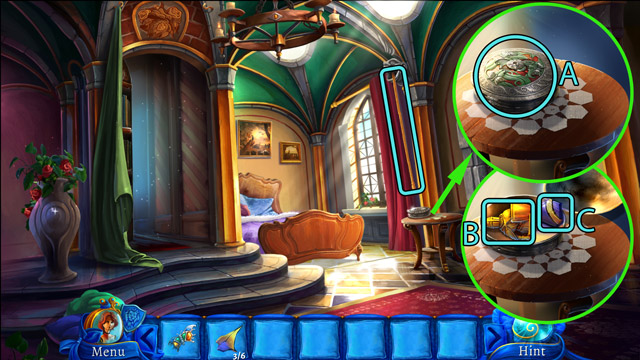
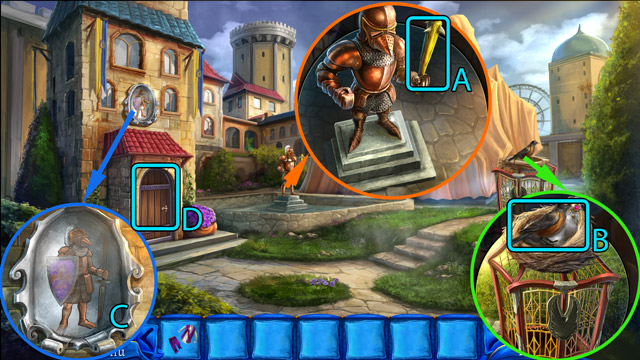
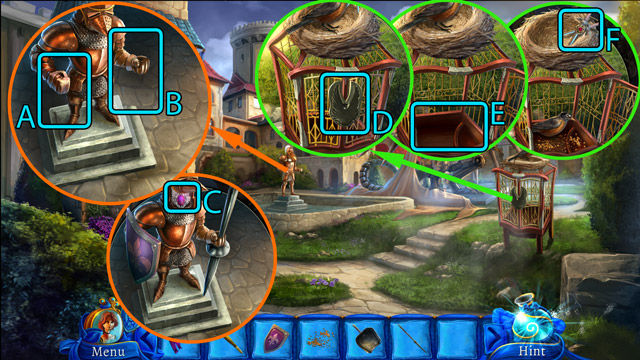
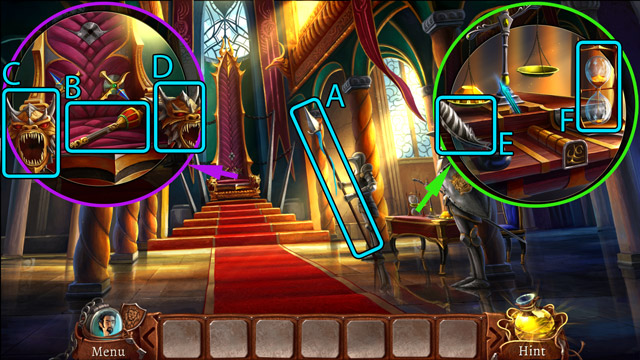
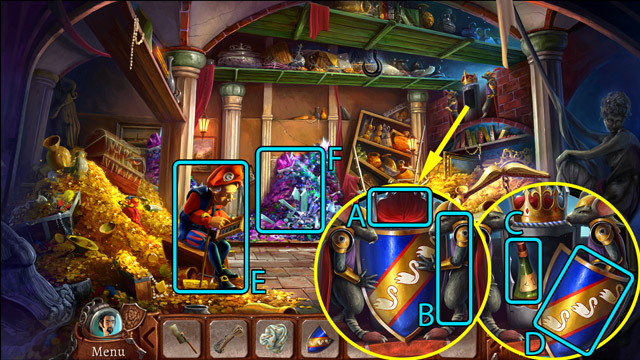
- Put the Knight figurine on the empty stand (A) on the table.
- Pick up the Piece of ornamental face (B) from the drawer.
- Pick up the sixth and last Piece of stained glass (C) which will give you the Pieces of stained glass.
- Use the Pieces of stained glass on the broken glass in the window (D) and play the minigame.
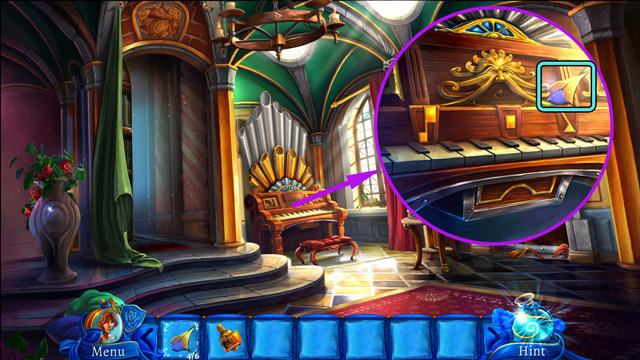
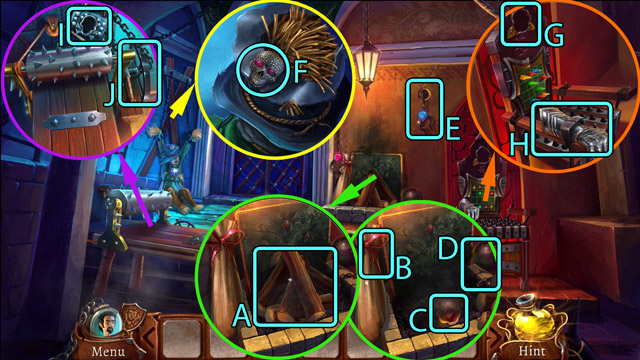
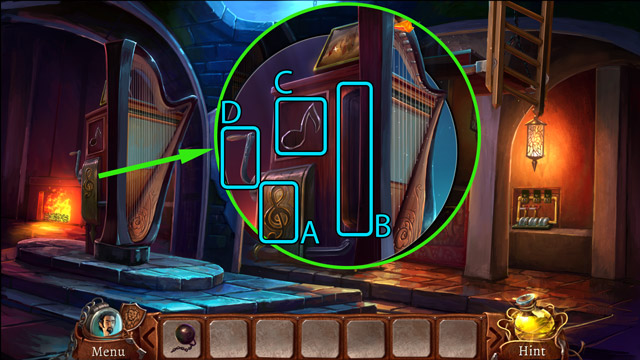
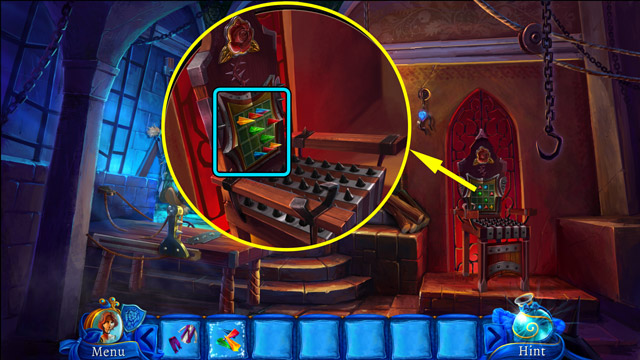
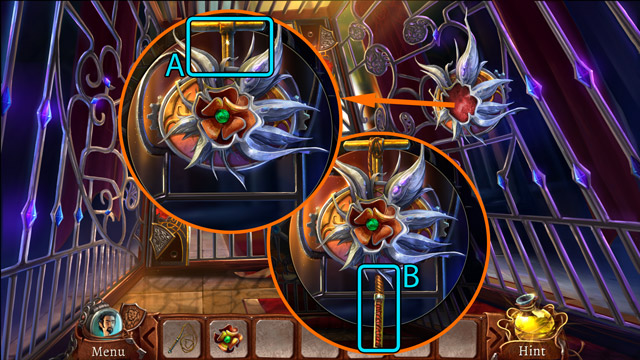
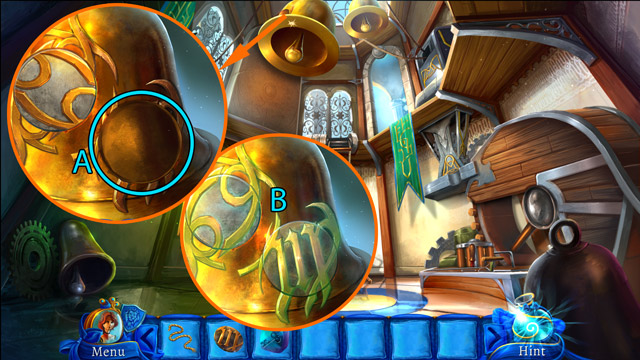
- Insert the Piece of ornamental face into the decorative head (A) in the organs.
- Play the minigame.
- Pick up the Small key (B).
- Uncover the lid on the wall and then use the Small key in the keyhole.
- Go to the corridor behind the shattered mirror.
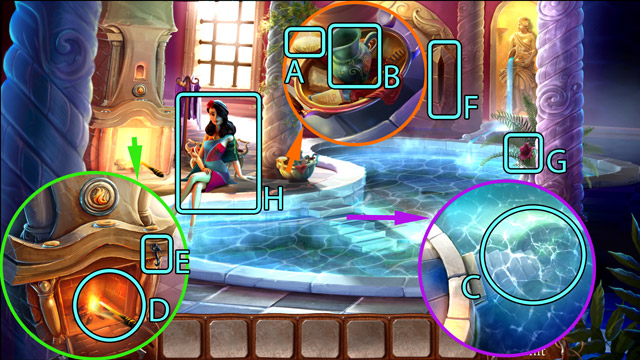
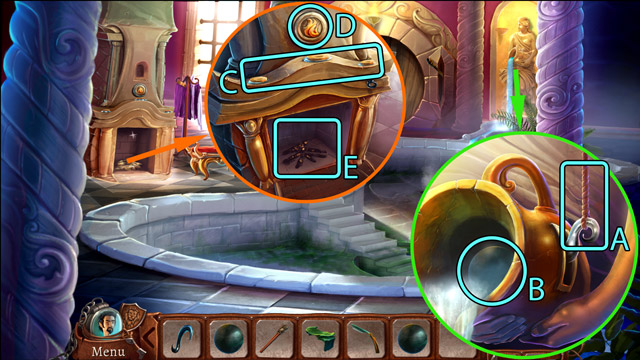
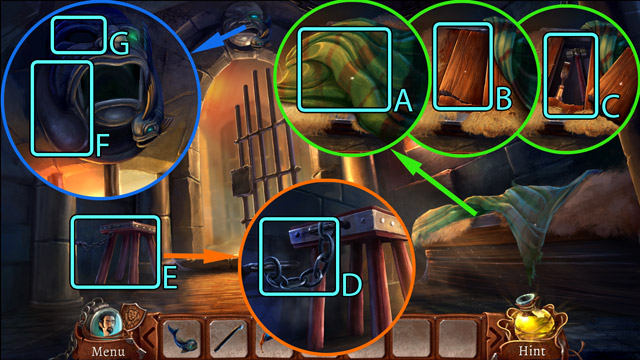
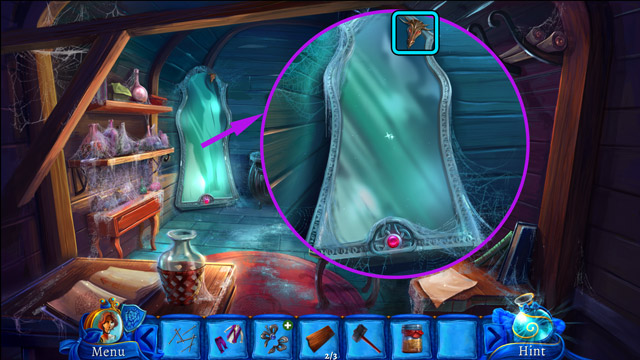
- Pick up the Brush (A) and the Jug (B) from the bath accessories.
- Fill the Jug with pool water (C) to obtain the Jug with water.
- Extinguish the fire in the fireplace (D) with the Jug with water. Then pick up the cooled down Poker.
- Pick up the Hook (E).
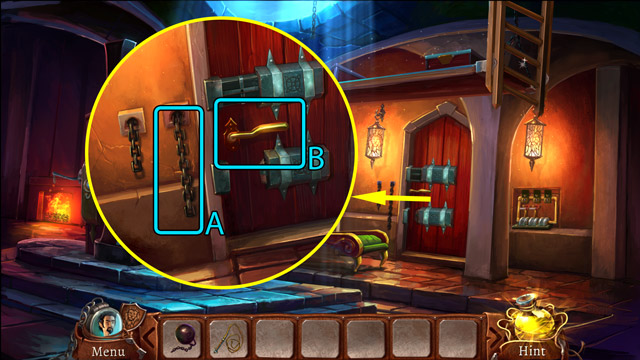
- Intert the Poker into the gap next to the door (F) and then pull it. It will drain the water from the pool.
- To apologize to the Bath Maid for this prank pick up the Beautiful flower (G) and give it to her (H). She will give you the Piece of mosaic.
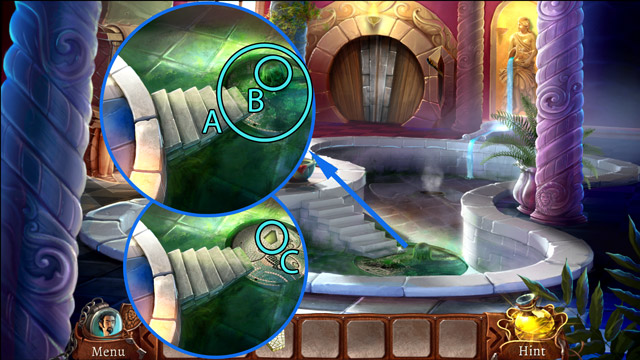
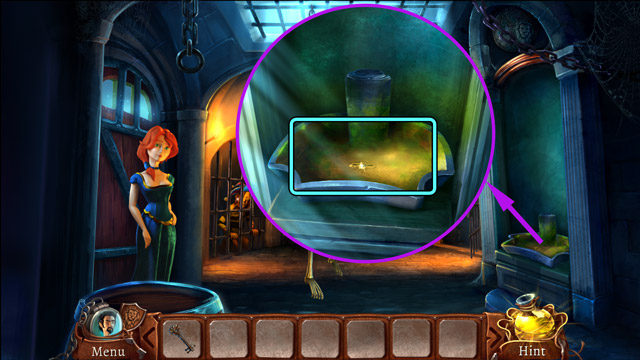
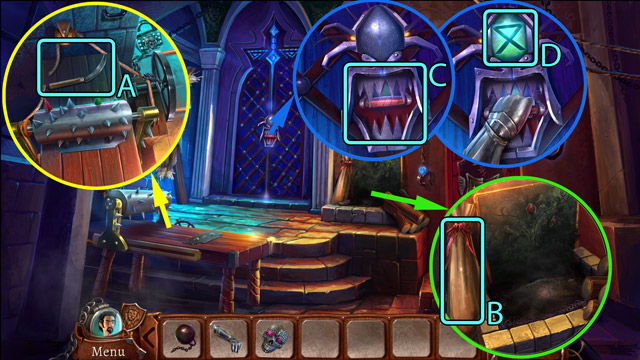
- Use the Brush to scrub the dirt from the floor of the pool (A).
- Pick up the Marble ball (B).
- Use the Piece of mosaic on the broken mosaic (C) and play the minigame. After that, go down the secret passage at the bottom of the pool.
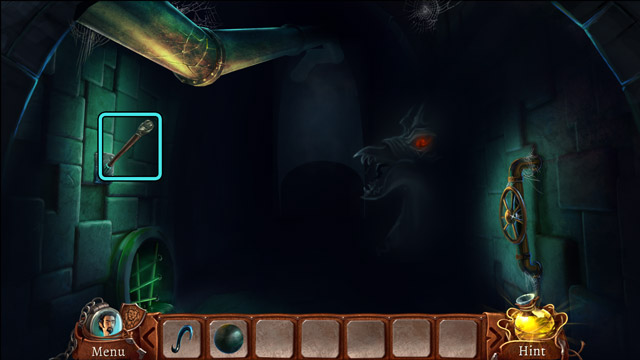
- Pick up the Unlit torch and go back to the baths.
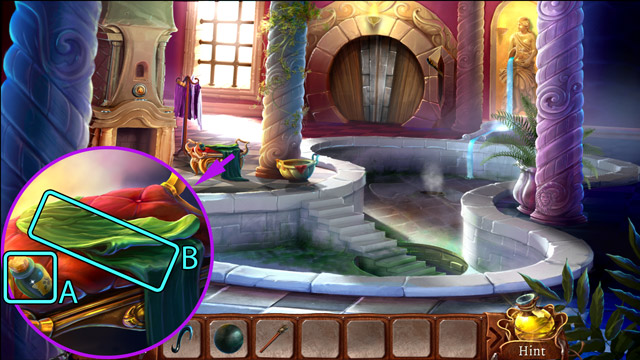
- The Bath Maid have disappeared, so you can take a look at the sofa where she was sitting.
- Pick up the Body oil (A) and the Shawl (B).
- Then get down to the canals.
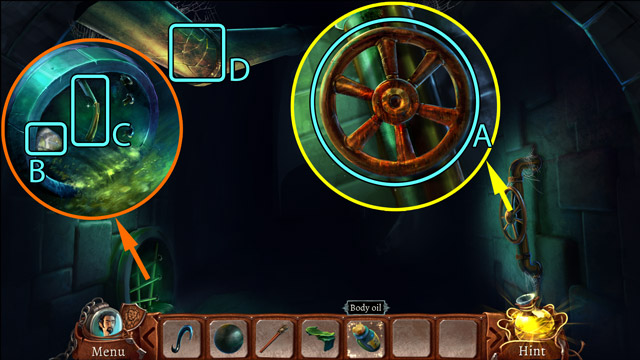
- Oil the rusty valve (A) with the Body oil.
- Pick up the Stone (B) and the Razor (C).
- Use the Stone to knock out a hole in the cracked pipe (D). Then pick up the Marble ball that just fell out.
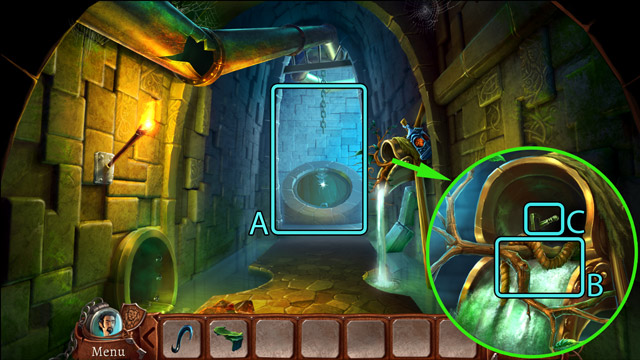
- In the baths cut the rope (A) using the Razor and then pick up the third Marble ball (B).
- Place all three Marble balls on the fireplace slots (C) and press the flame button (D).
- Fire up the Unlit torch from the fire (D) to get the Lit torch.
- Place the Lit torch in the torch holder to light up the canals.
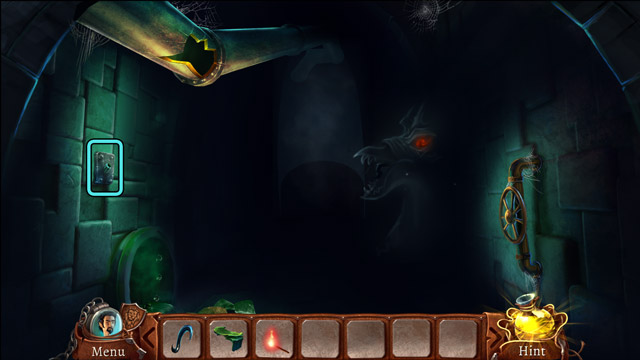
- Try to go straight (A). It's a trap, so you'll have to defuse it.
- Look at the pipe with protruding branches. Pick up the Piece of rope (B) and pull the small lever (C).
- Pick up the Spike (A) an use it to pry the pushed stone (B).
- Untie both bows (C).
- Now the way is clear, but the lid of the hatch is heavy and is closing every time.
- Use the Hook to attach the lid (D) to the chain.
- Combine the Piece of rope with the Shawl to get the Makeshift rope.
- Use the Makeshift rope on the hatch (D) to go down.
Chapter 2: Enter the horror
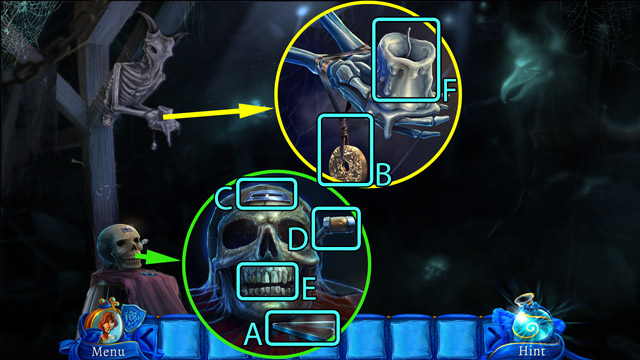
- Pick up the Piece of glass (A).
- Cut off the Gold coin (B) from the cord.
- Put the Gold coin in the slot on the skull's forehead (C).
- Push the lever (D) three times.
- Pick up the Tinderbox from the skull's jaws (E).
- Use the Tinderbox on the candle (F) to light up the room.
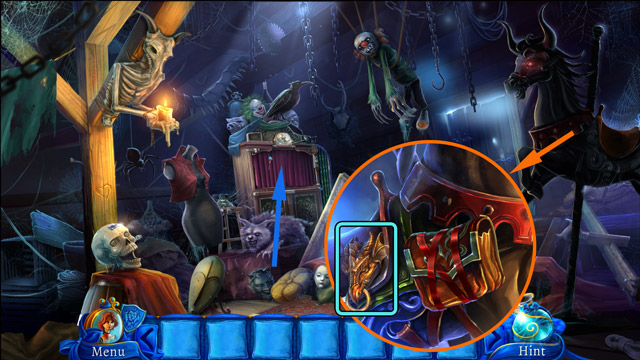
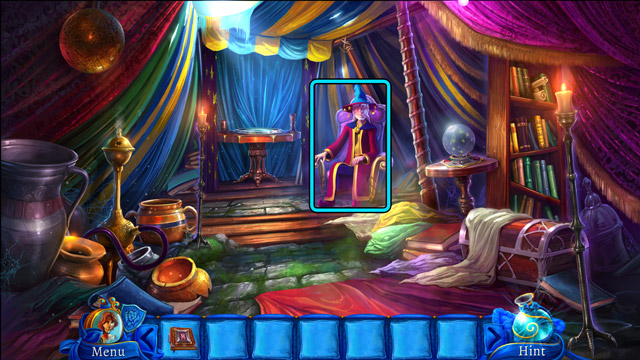
- Look at the merry-go-round horse and pick up the Dragon adornment.
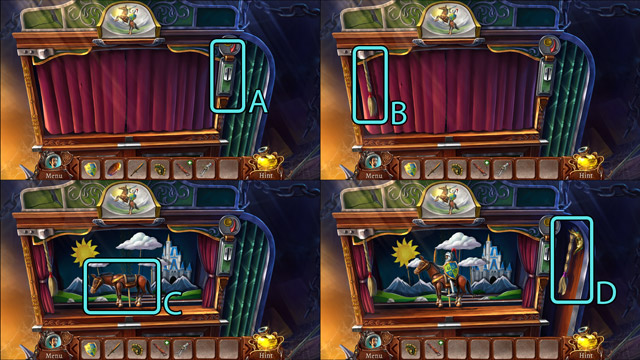
- Look at the puppet theater in the back.
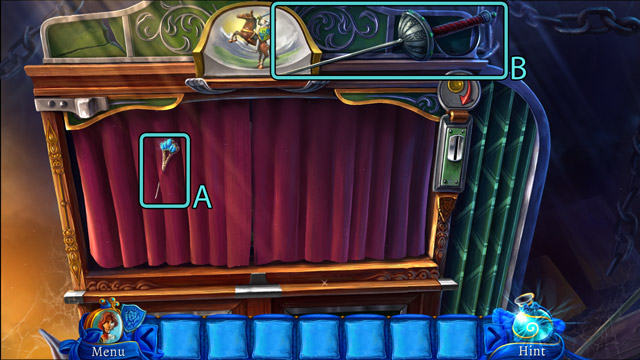
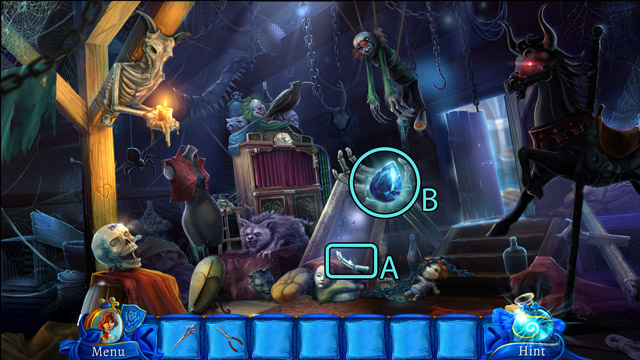
- Pick up the Hair pin (A) and the Rapier (B).
- Open the door latch (A) using the Rapier.
- Press the handle (B) to open the door.
- Go inside.
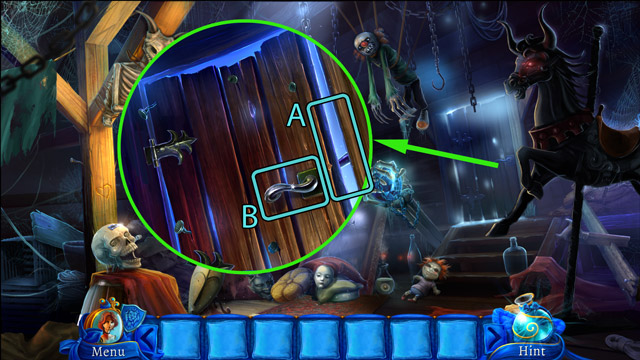
- Pick up the File (A).
- Pick up the Tongs (B).
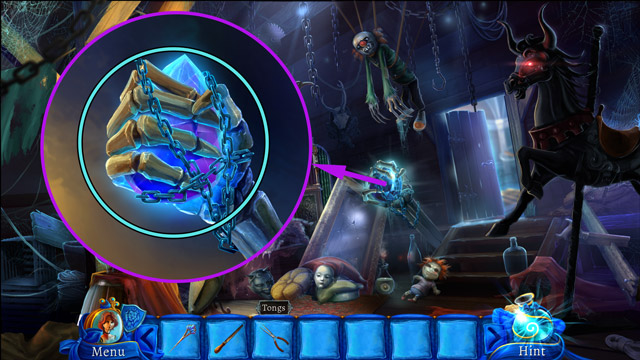
- Use the File to remove the chains on the skeleton hand.
- Play the minigame.
- Pick up the Broken bone (A) and the Crystal (B).
- Go to the garage.
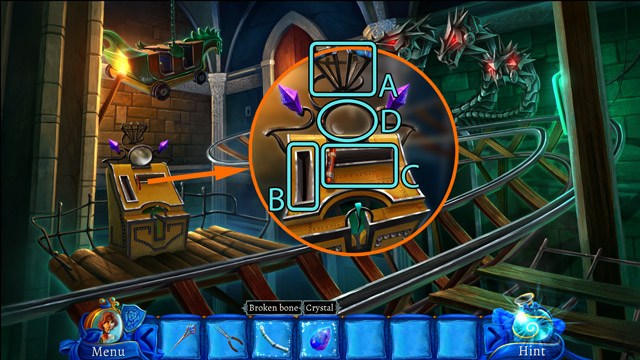
- Put the Crystal in the strange construction's slot (A).
- Put the Broken bone in the slit (B).
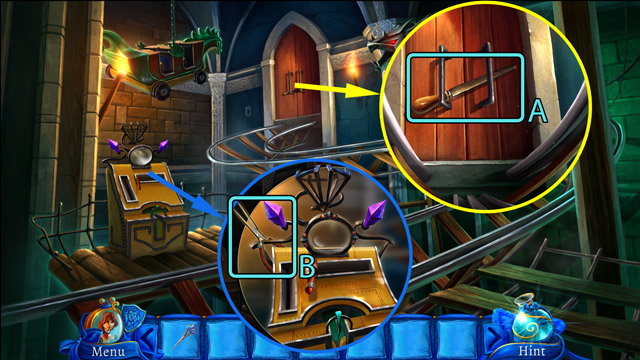
- Switch the skeleton handle (B) to move the hanging wagon horizontally.
- Then switch the red handle (C) to move the hanging wagon vertically and place it on the tracks.
- When the wagon is placed on the tracks, pick up the Lens (D)
- Enter the wagon.
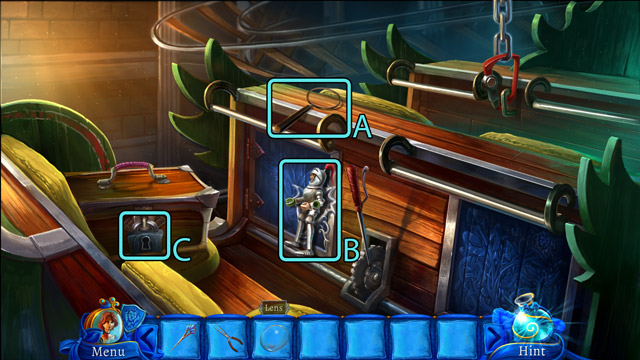
- Pick up the Lensless magnifier (A) and the Puppet knight (B).
- Open the padlock (C) with the Hair pin.
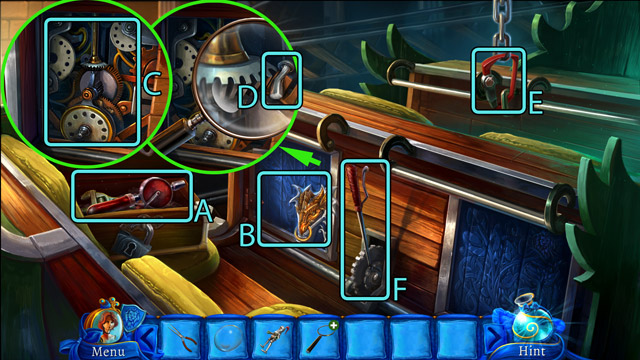
- Pick up the Hand drill (A) and the Wrench under it.
- Insert the Dragon adornment into its place on the small door (B) and open it.
- Look at the mechanism. Combine the Lens with the Lensless magnifier to get the Magnifier.
- Use the Magnifier on the mechanism (C).
- Remove the piece of metal (D) using the Tongs.
- Unscrew the screw on the locked carabiner (E) with the Wrench.
- Switch the lever (F).
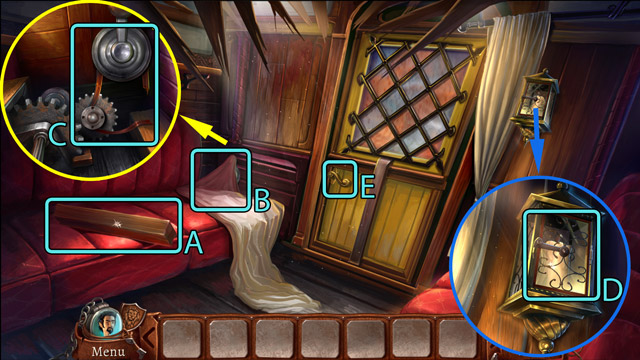
- Pick up the Wood log (A).
- Remove the teared curtain (B) and look at the mechanism under it.
- Remove the loose belt (C).
- Open the lantern (D) and pick up the Candle.
- Open the door pressing the handle (E) and go out.
- Pick up the Puppet shield (A) and open the lantern under it.
- Using the lantern fire (B) fire up the Candle to get the Lighted candle.
- Break off the handle (C) with the Wood log and pick up the Door handle.
- Pick up the Puppet sword (D).
- Burn the rope (E) blocking the wheel using the Lighted candle.
- Take the clothes (F) and dress up. You will also find the Gold coin in the pocket. After that pick up the Leather belt behind the clothes.
- Go back to the carriage.
- Use the Leather belt on the seat folding mechanism and then turn the handle.
- Look at the safe and pick up the Brass sun (A). Then insert the Door handle in the hole and press it.
- Pick up the Crossbow (B) and the Tenpin under it.
- Put the Tenpin to the hole in the metal wheel and turn it.
- Talk to Loreen. She'll give you the Puppet knight.
- Go through the opened door to the rollercoaster garage, then back the storage room and to the puppet theater.
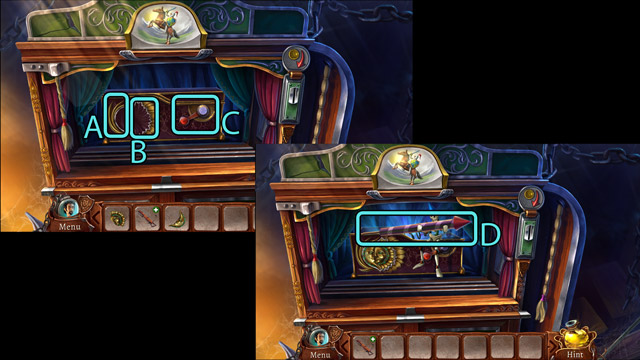
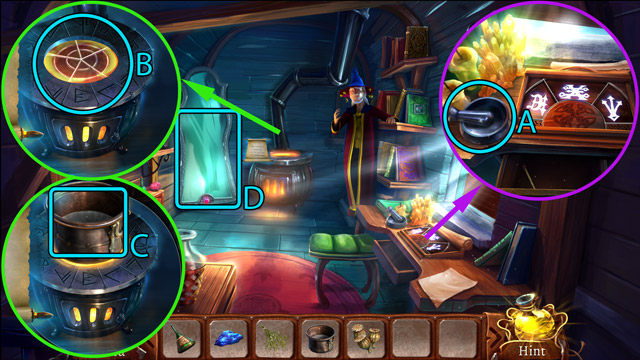
- Insert the Gold coin in the coin slot (A).
- Pull the curtain rope (B).
- Place the Puppet knight on the horse (C) and then give him the Puppet shield and the Puppet sword.
- Pick up the Brass moon (D) and pull the string.
- Insert the Brass sun into its slot (A).
- Insert the Brass moon into its slot (B).
- Turn the crank (C).
- Pick up the Fireworks (D).
- The hydra came alive! You have to defeat it.
- Combine the Crossbow with the Fireworks to get the Loaded crossbow.
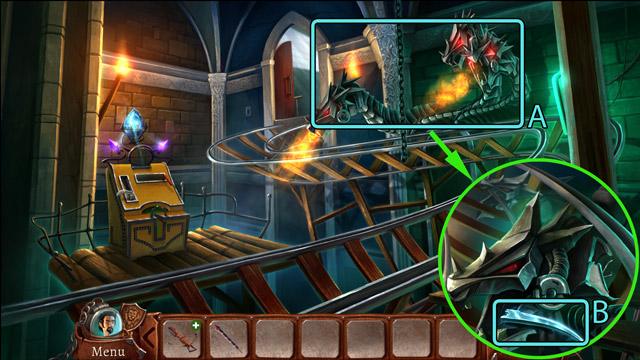
- Shoot the hydra (A) with the Loaded crossbow.
- Pick up the Hydra's tooth (B).
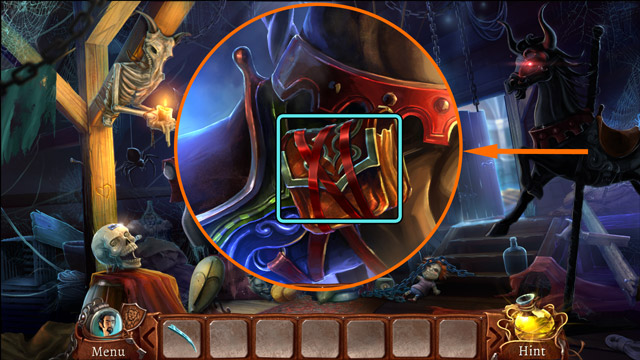
- Cut the strings off using the Hydra's tooth. Then pick up the Apples.
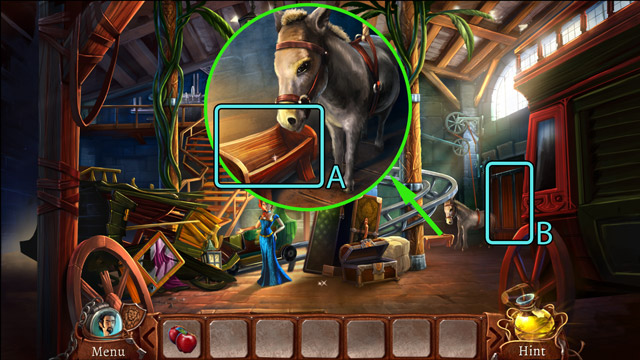
- Give the Apples to the donkey (A).
- Go through the opened gate (B).
Chapter 3: Terrible mistake
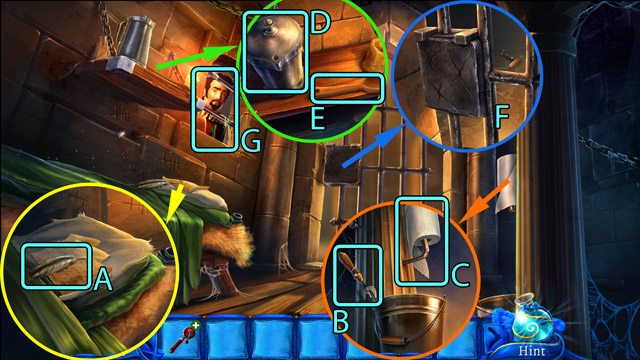
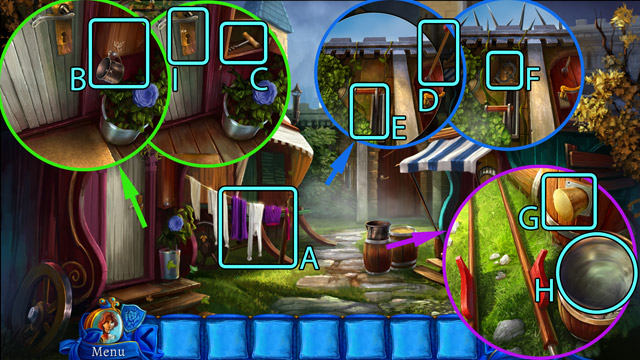
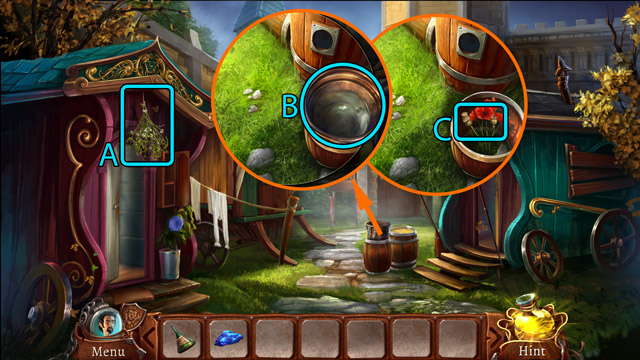
- Pick up the Feather (A).
- Pick up the Can Opener (B) and the Toilet paper (C).
- Use the Can Opener to open the jug (D), then pick up the Eye bolt from the inside of the jug.
- Pick up the Wooden spoon (E).
- Look at the cell door (F). There is a hook behind the bars.
- Ask Nathaniel for help (G).
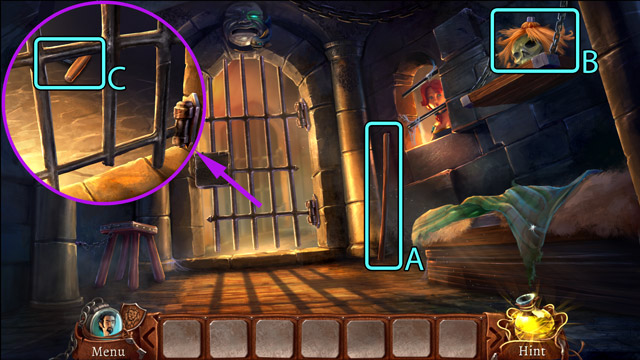
- Pick up the Stick (A) and the Broom head (B).
- Combine the Stick with the Broom head to get the Broom.
- Grab the Hook tool (C) with the Broom and pick it up.
- Give the Hook tool to Loreen.
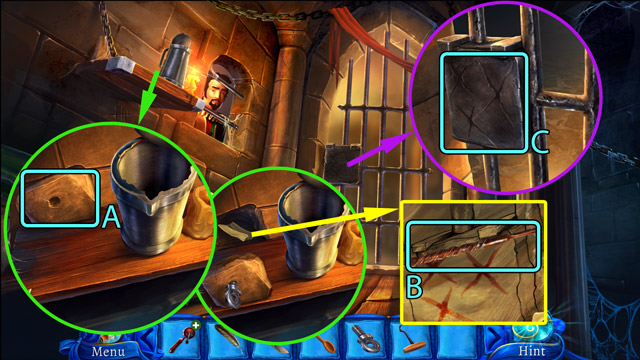
- Put the Eye bolt in the drilled stone (A). Then use on it the Hook tool to pull out the stone.
- Open the bundle and pick up the Drill bit (B).
- Combine the Hand drill with the Drill bit to get the Drill.
- Use the Drill on the door lock (C) to open the cell. Then get out of the cell.
- Open the manacle (A) using the Feather.
- Pick up the Keys (B).
- Use the Keys on the lock (C).
- Play the minigame.
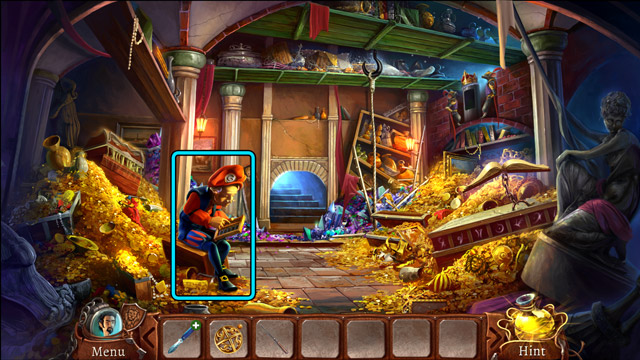
- Pull out the Fish statue (A) and pick it up.
- Talk to Loreen (B). She'll give you the Toilet paper if she has it. Alternatively, go to her cell and pick it up.
- Wipe out the slime (C) using the Toilet paper.
- Pull out the Iron bar (D) and then pick up the Jester's Cap (E).
- Give the Jester's Cap to the Prisoner. He will give you the Malachite.
- Move the blanket (A) on the bed.
- Pry the broken plank (B) with the Iron bar.
- Pick up the Chisel and hammer (C).
- Break the chain (D) using the Chisel and hammer.
- Move the stool (E).
- Insert the Fish statue into the ugly face slot (F).
- Insert the Malachite into the ugly face slot (G).
- When the ugly face opens, pick up the Old key.
- Insert the Old key into the hole.
- Insert the Wooden spoon into the switch hole and switch it up.
- Go out through the opened door.
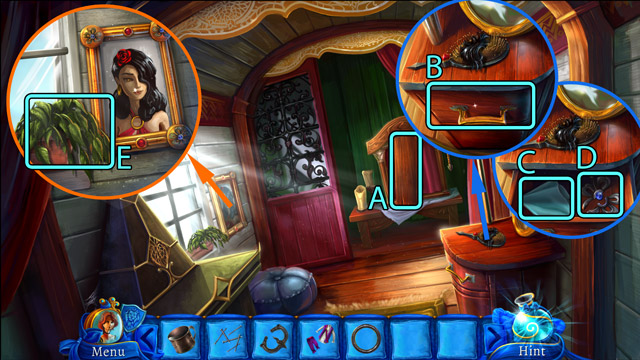
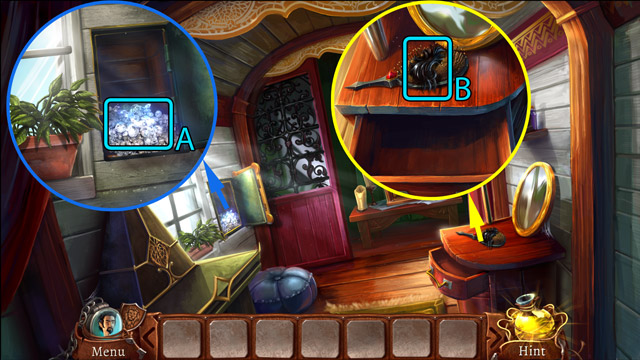
- Pick up the Nathaniel's clothes (A). You will also find the Corkscrew in the pocket.
- Pick up the Mug (B) and then open the closet behind it.
- Pick up the Metal ring (C).
- Try to pick up the arrow (D). Unfortunately it breaks down and you get the Broken arrow.
- Switch the lever on the wall (E).
- Pick up the Door knocker (F).
- Use the Corkscrew to remove the bung (G) stuck in the barrel hole. Then use the Broken arrow on that hole to pull out the Key.
- Fill the Mug with water from the culdron (H) to get the Mug with water. Then pick up the Nails from the bottom of the cauldron.
- Put the Key into the keyhole (I) then switch it and press the handle to open the door.
- Pick up the first Plank (A).
- Open the drawer (B).
- Pick up the Cloth (C) and the Broken ornament (D).
- Water the withered flower (E) using the Mug with water.
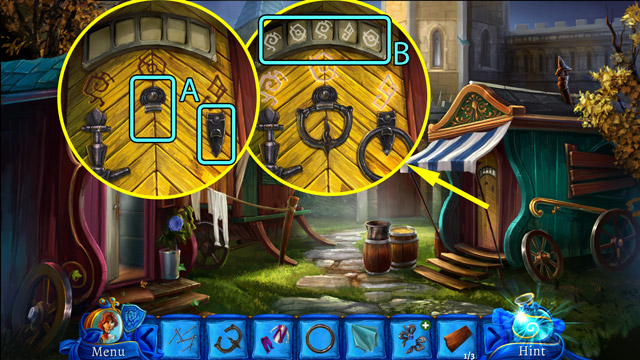
- Place the Metal ring and the Door knocker on the right wagon's door (A).
- Use the doorknockers in the proper order, as displayed above the door (B).
- Go to the right wagon.
- Pick up the second Plank (A).
- Pick up the Glue (B).
- Pick up the Hammer (C).
- Clean the dirty mirror (D) using the Cloth.
- Move all the wood logs aside (A).
- Try to untie the bow (B) on the sack.
- Pick up the Ornamental rose (C).
- Pick up the Ball and chain (D).
- Pull the right chain (E) to pull up the scarecrow.
- Pick up the Diamond skull (F).
- Put the Ornamental rose in the hole (G) in the chair.
- Pick up the Gauntlet (H).
- Insert the Diamond skull into the skull padlock (I).
- Turn the crank (J).
- Pick up the Sickle (A).
- Cut through the tied sack (B) with the Sickle and pick up the Branding iron.
- Pull the lever (C) using the Gauntlet.
- Insert the Branding iron in the hole (D).
- Go through the opened entrance.
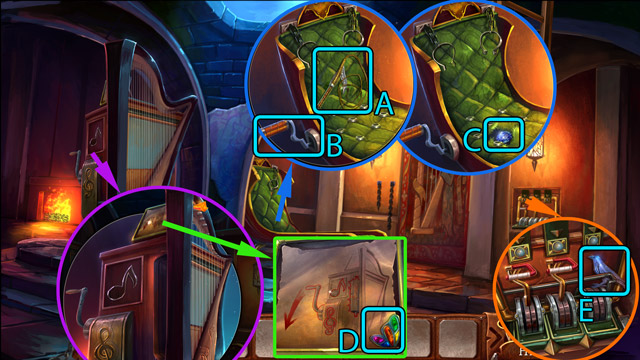
- Pick up the Bullwhip (A) and the Diamond pin under it.
- Turn the Lever (B).
- Pick up the Jewel (C).
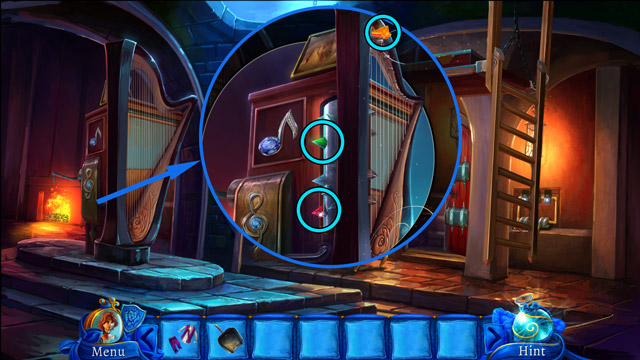
- Look at the harph and then look at the instructions.
- Pick up the Butterfly wing (D).
- Pick up the Ornamental bird (E).
- Pull the left chain (A) to lower the scarecrow.
- Insert the Ornamental bird into the place on the scarecrow's necklace (B).
- Pick up the Treble clef (C).
- Use the Butterfly wing on the broken butterfly (D) and switch it.
- Pick up the Spiked cylinder (E).
- Combine the Diamond pin with the Jewel to get the Jewel note.
- Put the Treble clef, Spiked cylinder and Jewel note in their places on the harph (A) (B) (C)
- Switch the lever (D).
- Attach the Ball and chain to the longer chain (A) and then pull the shorter chain.
- Press the handle (B).
- Pick up the Oramental dragon.
- Go to Nathaniel's cell.
- Pick up the third and last Plank (C) which will give you the Planks.
- Go to the left wagon.
- Combine the Broken ornament with the Glue to get the Ornamental flower.
- Insert the Ornamental flower into the portrait (A).
- Uncover the tablecloth (B).
- Then look at the engravings in the wood (C). It is the right order for the knobs on the safe (D). Switch every knob as instructed. Pick up the Ornamental knives.
- Pull the rope (E) beside the altar curtain.
- Put the Ornamental knives in the chest (F) and pick up the Knife.
- Place the Planks on the stilts (A). Then put in the Nails and build the ladder using the Hammer
- Pick up the Ladder (A).
- Cut off the vines (B) using the Knife.
- Insert the Oramental dragon into the hole (C).
- Place the Ladder on the wall (D).
- Go over the wall.
Chapter 4: Behind the wall
- Pick up the Club (A).
- Try to touch the bird (B) and when it flew away pick up the Cotton balls.
- Look at the decorative painting (C). It is the clue associated with the attributes you should give to the knight.
- Open the door (D) and get inside.
- Fire the ballista using the trigger (A).
- Pick up the Colored circles (B).
- Pick up the Needle and thread (C) and the Bread crumbs (D).
- Pick up the Ash pan (E).
- Insert the Colored circles into the place under the cover.
- Play the minigame.
- Pick up the Teddy bear remains.
- Combine the Teddy bear remains with the Cotton balls to get the Ripped teddy bear.
- Combine the Ripped teddy bear with the Needle and thread to get the Teddy bear.

- Give the Teddy bear to the guardian (A).
- Pick up the Key that the guardian dropped (B).
- Open the padlock (C) using the Key.
- Pick up the Lance (D).
- Insert the Lance into the knight's hand (A).
- Insert the Shield into the knight's hand (B).
- Pick up the Amulet (C).
- Put the Amulet into its place on the cage (D).
- Place the Bread crumbs in the cage (E).
- Pick up the Symbol of swords (F).
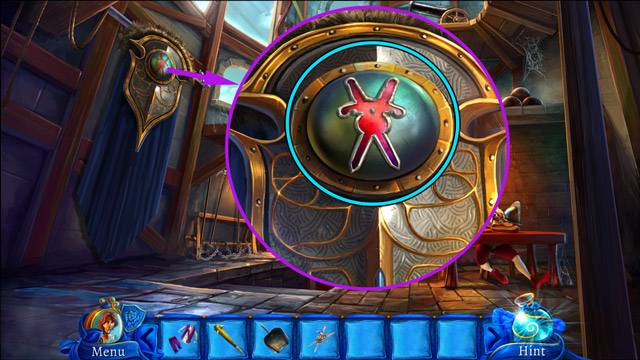
- Insert the Symbol of swords into the place on the shield.
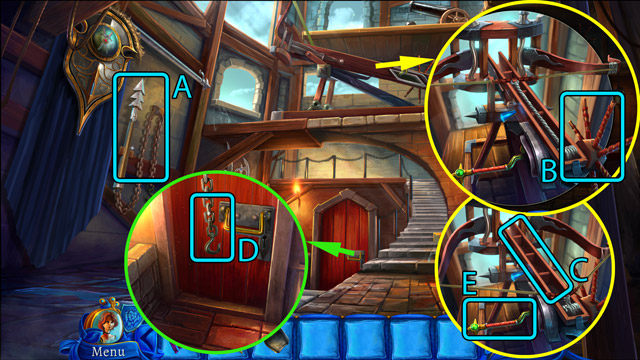
- Pick up the Harpoon (A).
- Cock the ballista using the crank (B).
- Load the ballista placing the Harpoon on it (C).
- Attach the hook to the handle (D).
- Shoot the ballista (E).
- Insert the Club into the empty socket (A).
- Switch every lever (B).
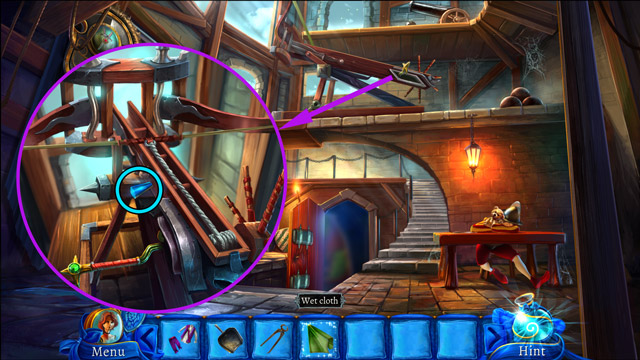
- Pick up the Tongs (C) and the Cloth.

- Soak the Cloth in the fountain to get the Wet cloth.
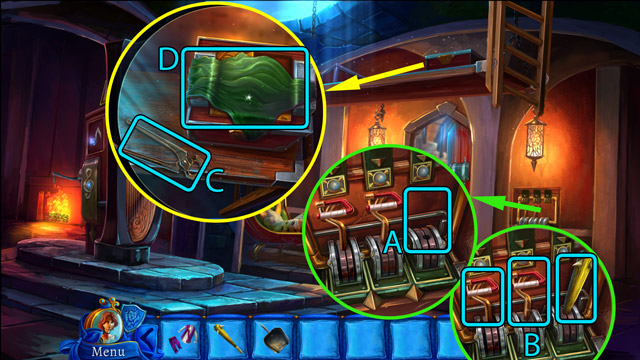
- Pull out the first Crystal spike using the Tongs.
- Pull out three more Crystal spikes on the harph using the Tongs.
- Clean the dirty iron plate (A) with the Wet cloth.
- Get ash (B) onto the Ash pan.
- Pull out the fifth Crystal spike (C) using the Tongs.
- Pick up the sixth Crystal spike (D).
- Pick up the Ornamental tile (E).
- Insert the Ornamental tile into the chest (A) and arrange the tiles in proper order (by clicking or tapping).
- Pick up the seventh and last Crystal spike (B) which will give you the Crystal spikes.
- Use the Crystal spikes on the back of the chair.
- Play the minigame.
- Pick up the Bat amulet.
- Insert the Bat amulet into the place above Nathaniel.
- Give the Nathaniel's clothes to Nathaniel.
Chapter 5: Royal blood
- Raise the carpet (A) and pick up the String and the Stone.
- Knock out the iron thorn (B) using the Stone. Then pick up the Iron hook.
- Combine the String with the Iron hook to get the Mini grappling hook.
- Grab the coin (C) with the Mini grappling hook. then pick up the Coin.
- Unscrew the screw in the corner (D) using the Coin.
- Pick up the Metal flower (E).
- Put the Metal flower in the missing ornament (F) in the right bottom corner of the cage.
- Unscrew the screw under the cover (G) using the Coin.
- Again pick up the Metal flower (F).
- Repeat the same actions as before for the other two corners.
- Put the Metal flower in the missing ornament (A) in the left top corner of the cage.
- Unscrew the screw under the cover (B) using the Coin.
- Again pick up the Metal flower (A).
- Put the Metal flower in the missing ornament (C) in the right top corner of the cage.
- Unscrew the screw under the cover (D) using the Coin.
- Again pick up the Metal flower (C).
- Put the Metal flower in the missing ornament (E) in the left part of the cage.
- Attach the Bullwhip to the lever (A).
- Pull the attached bullwhip (B).
- Get out of the cage.
- Pick up the Spear (A).
- Pick up the Scepter (B).
- Open the left armrest (C) and pick up the Gloves under it.
- Pull the right armrest (D) which opens the trap.
- Pick up the Feather (E) from the desk.
- Break the hour glass (F) and after that pick up the Gold sand.
- Use the Spear to grab the cactus (A).
- Use the Gloves to pick up the Key safety.
- Pick up the Thorn.
- Put the Gold sand, Feather and Thorn on the scales (D).
- Insert the Key into the uncovered keyhole (E) and switch it to open the desk safe. Then pick up the Ornament and observe the drawing.
- Place the Ornament on the back of the throne (F).
- Switch the throne ornaments as shown in the drawing from the desk safe (G).
- Go down the passage under the throne.
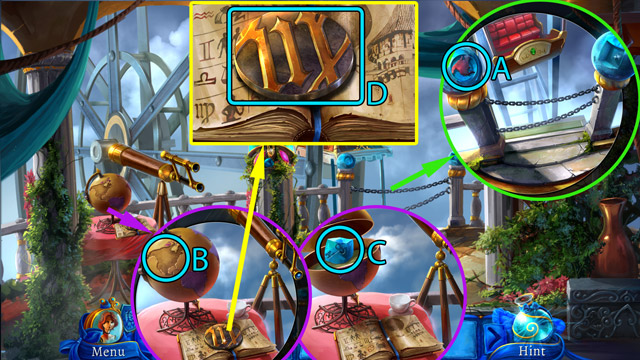
- Pick up the Glasses (A).
- Give the Glasses to the Treasurer (B). He will give you the Torn calculations asking you to repair them using the magic book.
- Put the Torn calculations on the magic book (C).
- Pick up the Calculations (D).
- Give the Calculations to the Treasurer (B). He will give you the Sleeping potion.
- Pick up the Jagged cleaver (E).
- Pick up the Rope (A).
- Use the Sleeping potion on the living chest (B).
- Open the sleeping chest (C).
- Play the minigame.
- Pick up the Crown (A).
- Touch the ladder (B). It breaks down.
- Hang the Rope on the hook (C).
- Look at the top shelves and remove cowebs (D).
- Pick up the Silk cloth (G).
- Wipe the dirty cup (E) with the Silk cloth.
- Cut the chain (F) using the Jagged cleaver and pick up the Crystal cup.
- Insert the Crown into the slot under the coat of arms (A).
- Move the hand of the right supporter (B) to release the shield.
- Pick up the Bottle of wine (C).
- Pick up the Coat of arms (D).
- Combine the Crystal cup with the Bottle of wine to get the Cup of wine.
- Give the Cup of wine to the Treasurer (E). He will give you the Cane.
- Combine the Coat of arms with the Cane to get the Shovel.
- Remove the pile of jewels (F) using the Shovel.
- Exit from the treasury.
- Pull the tied handle (A). You will get the Handle and the Piece of rope.
- Switch the lever (B).
- Pick up the first (C) and the second (D) Bell symbol.
- Pick up the Hammer (E).
- Insert both of the Bell symbols into their places on the iron bars (A).
- Put the Handle in the shutter (B).
- Break the window (C) using the Hammer.
- Pick up the Wooden pegs (E) and the Piece of glass (D).
- Cut the rope (F) using the Piece of glass.
- Put the Wooden pegs in the broken clutch (G).
- Pull the lever (H).
- To stop the bell noise pull the lever one more time.
- Go out to the balcony.
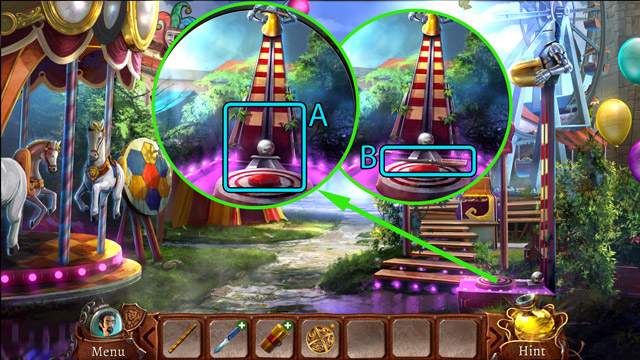
- Pick up the Strange shape (A).
- Insert the Strange shape into the globe (B).
- Pick up the Cubic stone (C).
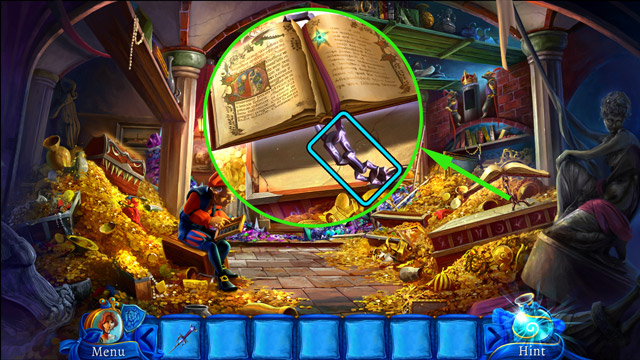
- Pick up the Ornamented disc from the book (D).
- Insert the Ornamented disc into the place on the bell (A).
- Switch both of the discs (B) so that it presents two zodiac signs.

- Pick up the Cylindrical stone (A).
- Select Virgo on the left part of the device (B).
- Select Cancer on the right part of the device (C).
- Pull the lever (D).
- Put the Cylindrical stone in the left empty spot (E).
- Put the Cubic stone in the right empty spot (F).
- Jump to the ferris wheel's gondola.

- Pick up the Flute (A).
- Play the Flute to charm the snake (B).
- Pick up the Cane (C).
- Move the pillows (D).
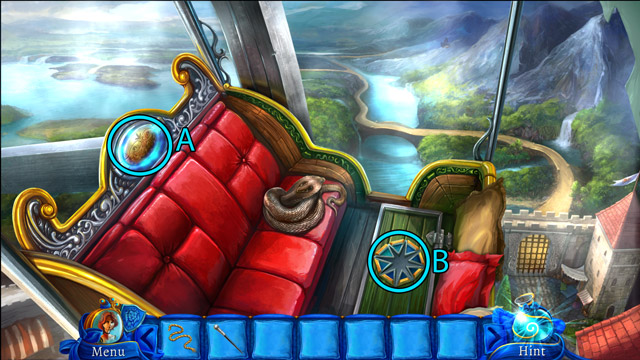
- Press the buton (A). It will open the safe. Pick up the Star from it.
- Insert the Star into the slot on the compartment (B).
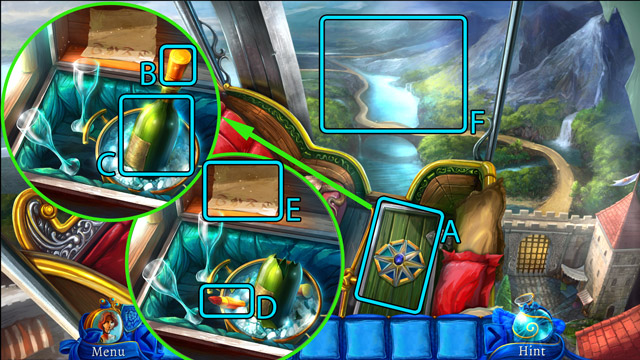
- Attach the compartment lid (A) to the pipe using the Piece of rope.
- Ramove the bottle cap (B).
- Break the bottle (C) using the Cane.
- Pick up the Lipstick (D).
- Write the message on the paper (E) using the Lipstick. Then make the Paper dart from it and pick it up.
- Throw the Paper dart (F).
Chapter 6: Powerful magic
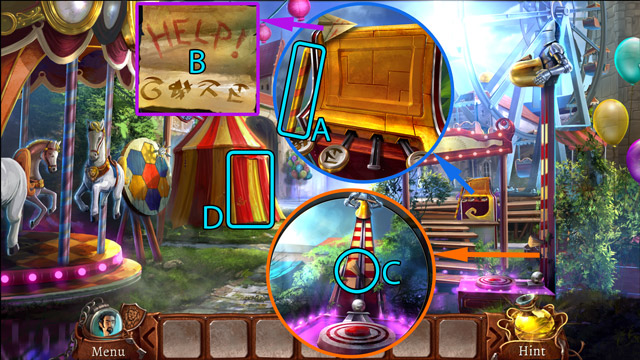
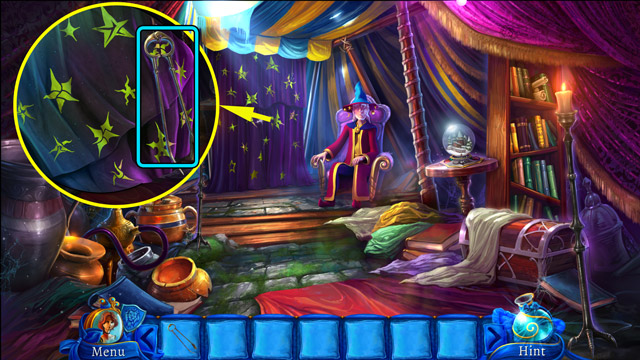
- Pick up the Stick (A).
- Look at the message on the paper dart (B) and pay attention to the symbols at the bottom.
- Remove the Wedge using the Stick (C).
- Uncover the tent entrance (D) and go there.
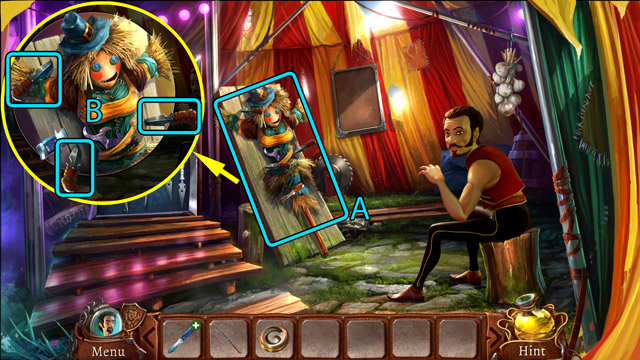
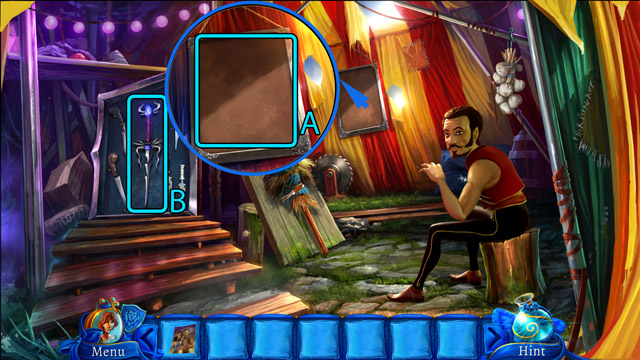
- After dialogue with the Knife Thrower pick one Blunt knife from his set of knives (A).
- Turn the picture around (B).
- Pick up the Brooch (C).
- Pick up the Hammer head (D).
- Combine the Stick with the Hammer head to get the Hammer.
- Hit the high striker (A) with the Hammer twice.
- Pick up the Sharpener (B).
- Give the Brooch to the Treasurer. He will give you the Button.
- Combine the Blunt knife with the Sharpener to get the Knife.
- Throw the Knife at the target (A).
- Pick up the Throwing knives (B).
- Throw the Throwing knives at the target (A).
- Pick up the Crystal (B).
- Put the Button in the control panel (C). Then press the buttons in the right order.
- Insert the Crystal into the slot (D).
- Press the button (E).
- Enter the blue tent.
- After dialogue with the Wizard pick up the Tongs.
- Leave the tent.

- Speak with Nathaniel.
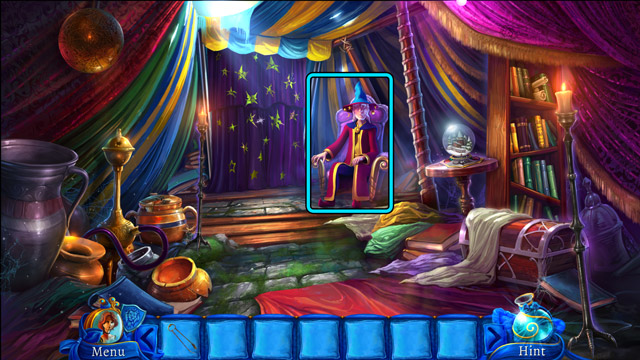
- Go back to the Wizard's tent and talk to the Wizard.
- Go out and talk to Nathaniel.
- Talk with the Knife Thrower.
- Pass information to Loreen.

- Talk to the Wizard. He will give you the Magic wand.
- Pick up the Star.
- Pick up the Mysterious sign (A).
- Pick up the Garlic (B).
- Insert the Mysterious sign into the snowglobe base (A).
- Play the minigame (B).
- Insert the Star into the hole in the pot's lid (C).
- Take the Scorpion (D) with the Tongs.
- Touch the marked stars (E).
- Place the Scorpion and the Garlic on the magic table (F) and use the Magic wand on them. Then pick up the Pill of happiness.
- Give the Pill of happiness to Nathaniel.
- Give the Pill of happiness to the Knife Thrower. He will give you the Torn picture.
- Put the Torn picture on the magic book (A).
- Pick up the Repaired picture (B).
- Go back outside.
- As Loreen go to the Thrower's tent.
- Put the Repaired picture inside the empty frame (A).
- Pick up the Magic knife (B)
- Cut the magic chain using the Magic knife. After that pick up the Magic book.
- Give the Magic book to the Wizard.
- Pick up the Magic potion (A).
- Look at the runes on the wall (B). They show the right order for the buttons on the desk.
- Press the buttons on the desk in the right order.
- Pick up the Magic stick (C) and the Symbol (D) from the drawer.
- Insert the Symbol into the slot in the chest (E). Then pick up the Blue magic dust from the chest.
- Open the stove door (F).
- Put the wood logs (G) into the stove.
- Light the fire in the oven (H) using the Magic stick.
- Go outside.
- Pick up the Mistletoe (A).
- Pick up the Cauldron (B).
- Pick up the Poppy heads (C).
- Crush the Poppy heads in the mortar (A). Then pick up the Poppy seeds.
- Put the Cauldron on the stove top (B).
- Add the Mistletoe, the Magic potion, the Blue magic dust and the Poppy seeds to the cauldron (C).
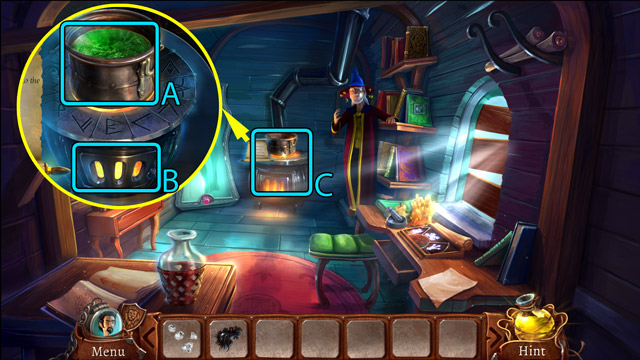
- After dialogue with the Wizard look at the mirror (D).
- After dialogue with the Wizard go to the Bath Maid's wagon.
- Pick up the Diamonds (A).
- Pick up the Hair lock (B).
- Add the Hair lock to the cauldron (A).
- Add the Diamonds to the stove (B).
- Play the minigame (C).
- Go over the wall using the ladder.
- Talk to Loreen and then (optionally) to the Bath Maid.
- Talk to the Wizard.
- Enjoy the final scene. Thank you for playing! :)

